Ultrastable atomic force microscopy: atomic-scale stability and registration in ambient conditions
- PMID: 19351191
- PMCID: PMC2953871
- DOI: 10.1021/nl803298q
Ultrastable atomic force microscopy: atomic-scale stability and registration in ambient conditions
Abstract
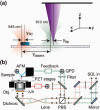
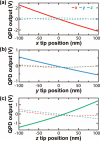
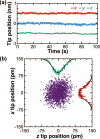
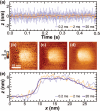
Instrumental drift in atomic force microscopy (AFM) remains a critical, largely unaddressed issue that limits tip-sample stability, registration, and the signal-to-noise ratio during imaging. By scattering a laser off the apex of a commercial AFM tip, we locally measured and thereby actively controlled its three-dimensional position above a sample surface to <40 pm (Deltaf = 0.01-10 Hz) in air at room temperature. With this enhanced stability, we overcame the traditional need to scan rapidly while imaging and achieved a 5-fold increase in the image signal-to-noise ratio. Finally, we demonstrated atomic-scale ( approximately 100 pm) tip-sample stability and registration over tens of minutes with a series of AFM images on transparent substrates. The stabilization technique requires low laser power (<1 mW), imparts a minimal perturbation upon the cantilever, and is independent of the tip-sample interaction. This work extends atomic-scale tip-sample control, previously restricted to cryogenic temperatures and ultrahigh vacuum, to a wide range of perturbative operating environments.
Figures


Similar articles
-
Ultrastable atomic force microscopy: improved force and positional stability.FEBS Lett. 2014 Oct 1;588(19):3621-30. doi: 10.1016/j.febslet.2014.04.033. Epub 2014 May 4. FEBS Lett. 2014. PMID: 24801176 Review.
-
High-resolution noncontact atomic force microscopy.Nanotechnology. 2009 Jul 1;20(26):260201. doi: 10.1088/0957-4484/20/26/260201. Epub 2009 Jun 10. Nanotechnology. 2009. PMID: 19531843
-
A cantilever-based, ultrahigh-vacuum, low-temperature scanning probe instrument for multidimensional scanning force microscopy.Beilstein J Nanotechnol. 2022 Oct 11;13:1120-1140. doi: 10.3762/bjnano.13.95. eCollection 2022. Beilstein J Nanotechnol. 2022. PMID: 36299563 Free PMC article.
-
Back-scattered detection provides atomic-scale localization precision, stability, and registration in 3D.Opt Express. 2007 Oct 1;15(20):13434-45. doi: 10.1364/oe.15.013434. Opt Express. 2007. PMID: 19550612
-
Atomic force microscopy with sub-picoNewton force stability for biological applications.Methods. 2013 Apr 1;60(2):131-41. doi: 10.1016/j.ymeth.2013.03.029. Epub 2013 Apr 4. Methods. 2013. PMID: 23562681 Free PMC article. Review.
Cited by
-
Piezotransistive transduction of femtoscale displacement for photoacoustic spectroscopy.Nat Commun. 2015 Aug 10;6:7885. doi: 10.1038/ncomms8885. Nat Commun. 2015. PMID: 26258983 Free PMC article.
-
Nanoscale electrical conductivity imaging using a nitrogen-vacancy center in diamond.Nat Commun. 2018 Jun 19;9(1):2406. doi: 10.1038/s41467-018-04798-1. Nat Commun. 2018. PMID: 29921836 Free PMC article.
-
Protein folding at single-molecule resolution.Biochim Biophys Acta. 2011 Aug;1814(8):1021-9. doi: 10.1016/j.bbapap.2011.01.011. Epub 2011 Feb 17. Biochim Biophys Acta. 2011. PMID: 21303706 Free PMC article. Review.
-
Anomalously Rapid Hydration Water Diffusion Dynamics Near DNA Surfaces.J Am Chem Soc. 2015 Sep 23;137(37):12013-23. doi: 10.1021/jacs.5b05813. Epub 2015 Sep 10. J Am Chem Soc. 2015. PMID: 26256693 Free PMC article.
-
Routine and timely sub-picoNewton force stability and precision for biological applications of atomic force microscopy.Nano Lett. 2012 Jul 11;12(7):3557-61. doi: 10.1021/nl301166w. Epub 2012 Jun 15. Nano Lett. 2012. PMID: 22694769 Free PMC article.
References
-
- Giessibl FJ. Rev. Mod. Phys. 2003;75:949–983.
-
- Müller DJ, Sapra KT, Scheuring S, Kedrov A, Frederix PL, Fotiadis D, Engel A. Curr. Opin. Struct. Biol. 2006;16:489–495. - PubMed
-
- Piner RD, Zhu J, Xu F, Hong S, Mirkin CA. Science. 1999;283:661–663. - PubMed
-
- Dai HJ, Hafner JH, Rinzler AG, Colbert DT, Smalley RE. Nature. 1996;384:147–150.
-
- Li M, Tang HX, Roukes ML. Nat. Nanotechnol. 2007;2:114–120. - PubMed
Publication types
MeSH terms
Grants and funding
LinkOut - more resources
Full Text Sources
Other Literature Sources
Miscellaneous

